Onesie centerpiece!

Hello Crafty friends! DT-Alma here, I wanted to share with you guys today these centerpieces for a Baby Shower!


I have a friend who's having twins, a boy and a girl, and I wanted to help her with the decor for the tables so I came up with these cute little boxes.. that i made them into centerpieces!


These boxes are from the Onesie Gift box set for Boy and girl, I made the regular boxes which btw are very easy to put together, I sealed the box for this purpose, then I hot glued a stick into the box, being careful not to damage the structure of the box, added to a base, finishing touches and.. their done! pretty easy ha!?


I hope you guys like them, and are inspired to make your own!


Lucky Rainbow Bears


Hello from Sue at Sue's Stamping Stuff!
 Today I am excited to post my first project for My Scrap Chick blog!


I like a party as well as the next person!  Every March it is my turn to host our monthly Bunco group.  St. Patrick's is a built in party theme for my decor!  I made these darling little Bear treat bags from the Lucky Rainbow Bears file  and added several  little Milk Carton boxes as part of my decorations.  

I used a mixture of paper piecing and print and cut for these projects.  My little Rainbow Bear is  paper pieced and the candy bag topper words are print and cut. That works pretty slick when you have a dozen to make! I filled the goody bags full of little "pots of gold" to finish them off.


It was hard not to eat the Rolo's...


I added money (and a rolo) inside the little milk carton boxes for the Prize Winners.  They always look forward to some  fun little craftiness when I am the hostess. These boxes are a perfect fit for this colorful St. Patrick's Day paper don't you think? I resized them so they came out very small...about 3 inches tall when finished.

                                           
           Look at this sloth of little bears!   
 (yes, I had to google what  to call a group of bears)

Thanks for stopping in today-I hope you enjoyed my projects and will share yours with us on our Facebook Page!

 Sue

Edgar Allan Poe Village


Hi, you're crafting with Sarah today!

It was recently Edgar Allan Poe appreciation day, and since I love anything macabre and Halloween I just had to make something to mark the occasion.

I found this candle stand and glass holder at my local Spotlight store.  I inverted the glass to make a cloche.  Inside it created a small village by using a My Scrap Chick Village Card template.


I cut the houses out with my exacto knife and then created a circle with the cutout.  Behind the village is a cardstock tube that has tiny lights on a copper wire.


Wrapped around the central tube are Edgar Allan Poe quotes, acetate bats ands books that I created using acetate pages.  You can see the tiny lights in the tube at the top of the photo.


The bottom of the stand has stamping, a bow and tag.


The top of the cloche has autumn leaves, skulls, a ghost and a glittery candelabra.

So there you have it, another way to use the Village Card template to decorate your home.


March Planner Pages by Shirley


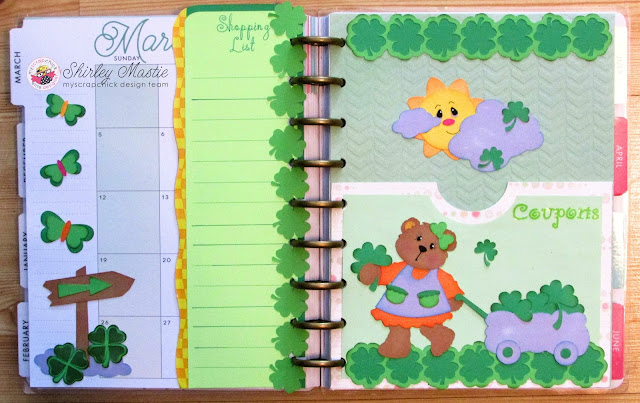
Hi! I think I have caught the planner bug! Today I would like to share my March planner pages using files from My Scrap Chick.

 
My Scrap Chick Files Used


For the border on the left side of the first page I used the sign from 
"Lucky Rainbow Bears." I used  the "DIY Planner Bookmark" file and my Cricut Explore to create a shopping list. 

 
The second page was created using the "DIY Planner Pockets Horizontal" file. I used the sun and cloud and the bear with wagon from "Lucky Rainbow Bears" to accent the planner pocket page.  I added a border to the top and bottom of the page using "4 Leaf Clover Trio." I also added a "Coupons" label to the pocket.

Files used:
Planner Pages
 
Other Products Used
 Embossed Brights by Craft Smith
Colored Cardstock from Recollections
Printed Cardstock from my scrap stash
Stickers from Making Memories

See even more details on my blog for my March Planner Pages

I hope you liked my planner pages! If you did, I would love if you left a comment. I'd love to hear from you!
 
~Shirley from Scrappy Sam's Designs

Happy Planning ~ with Cyndy G.

Hello crafty friends.  Today I am sharing with you some versatile planning files from My Scrap Chick.  I use a planner for work, so I was happy to see planners make it into the crafty world.  Its nice to have a planner made with my favorite papers!


I started with the Mini Planner Pockets.  This kit comes with three different pocket styles.


I am going to use mine to keep my receipts in.


I love this paper!  It is Graphic 45 - A Time To Flourish.  
It's just beautiful!


There are several different planners types available in multiple sizes.  You can see everything currently available here - Planners.

Thank you for stopping by.  I would love to see your planner pages, 
please stop by the My Scrap Chick fb page and share a picture.

Do what inspires you,
Cyndy G.

Thinking of You

 Hey there!!  Nicole here today with a card to share with you.  I made this card specifically as a get well card but it could be used for many different occasions.


I popped my purple flower up with some foam to create some dimension on my card.  


I even decorated the inside of my card with a flower :-) 

I used the following My ScrapChick files to create my card  -

 and 


Vinyl Monogram

Hi friends! This is Debb (Clickersister) and today I'm excited to bring you my first post for My Scrap Chick! I love creating personalized items, so I chose these files and made an anniversary tile!

 
I used the Flourish Monogram for the main letter, and the long flourish from the Flourish Placecard file. I duplicated it, then mirrored one of them to create the white image on each side. This was cut from two colors of vinyl, then applied to the 12x12 ceramic tile.

I hope you've enjoyed my project, along with all the other fabulous designs on My Scrap Chick. Thanks for stopping by!
 
Hugs! Debb

Paper Cake!!!

Hi Everyone! Julie here with Readysetstamp! I hope you all had a fabulous Valentine's Day and you were spoiled by your loved ones!!! Today my project is a darling birthday cake that I made for my son who will be 25 shortly.


I think my son is going to love this so much and I can't wait to give it to him! Be sure to head on over to My Scrap Chick today to purchase and make this darling cake for your loved ones!!!

 
I used the two tier birthday cake from My Scrap Chick along with Teal Small Dot paper from Coredinations. I also used some darling rhinestones from Michael's inside the flowers and I love how it turned out.

Basketball Layout

Tracy here from the Idea closet and today it is my turn to share a project at My Scrap Chick.
 
I love Scrapbooking but I haven't really done much for a while.
When I saw this Basketball Allstar kit, I just knew it would be perfect for a layout.


When my son was a little guy, he and his best friend started playing basketball with the Jr. Jazz.  
 
They played on a lot of teams together through the years but on their first team , Tyson's number was #15 and his friend was # 24; so when I made the little bears I cut out the numbers and put it on the jerseys.


To create the layout with the Cameo/Silhoutte
1. Open the court into a new drawing area and ungroup.
2. Rotate the court 90 degrees.
3. Resize the basketball court to 11.75" wide (do the width because you rotated the image).
4.With the knife tool, slice down the middle to create 2 halves.


5. Cut it out one side at a time
6. Open the allstar bear
7. Ungroup and layer all the pieces
8. Group and then size him to fit on your layout


9. Open the replicate window and mirror the bear so you have 2 facing different directions
10. Ungroup everything and cut the pieces.
11. Cut the title and any extra balls you may want and assemble.

Its actually pretty easy! This was such a fun little project to do and now I can't wait to go find all the many photos I have and get them scraped!

Be sure to check out the Basketball All Star kit, I promise you will love it.

Basketball Allstars: click to enlarge


A gumball machine - with Sarah

Hi everyone, you're joining Sarah all the way from Australia!

I have an awesome shaker card for you today using the paper piecing templates from the Gumball Machine Card files.


To show you how versatile these files are, I've changed this card up a bit by adding a shaker element to the globe.  I cut out all my pieces by hand (I don't own a cutting machine), and then created the globe with my Fuse Tool.  
 
I added some little metallic shapes and some plastic chicks and then sealed it up.  I added a couple of dots of hot glue to adhere the globe to the card.


The files you get with the Gumball Machine Card also come with inserts for the inside of the card - My Scrap Chick have thought of everything!
 
I doodled borders around each piece to help them stand out.


What would you put in your gumball machine?

Files used:

Cupcake Shaped Birthday Card

Hello there, Nicole here today with a fun birthday card to share with you.  My daughter's friend recently had a birthday and she celebrated with a Quincenara.  My daughter was one of her "attendants".   I wanted to make a fun and special card for her friend and this is what I came up with -


I used the "Cuppy Cake Treatkins" file and created a shaped card.  I enlarged my card quite a bit.  It is about 5.5 inches in height.  Since our present was the card and some money I wanted the card to be larger ;) 


To create my card base I made an offset of my cupcake's base layer and then cut it out two times.  The back layer of the card I scored about one inch or so down from the top.  I only adhered the top section of the back layer to the front to create the card base (you can see this up in my photograph).


I needed an envelope for my card to fit in so I chose the "Chunkie Square Envie 6.0"  and used some coordinating cardstock to make it with.  I think this turned out to be such a cute birthday card and it really went together quite quickly.  The slowest part was picking out my papers, lol!!


FILES USED


Chunkie Square Envie 6.0"


Kawaii Treatkins Cupcake